April 29, 2024
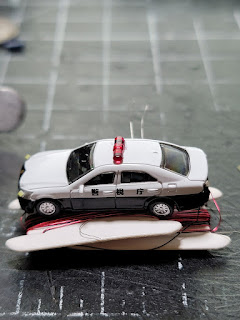
DIY Monday Kato foam locomotive cradle
Today I happened upon a YouTube video of a guy working on a locomotive and he had a cool locomotive cradle. I realized that the person had used foam inserts from cases like the one from Kato and other companies. I've always wanted a cradle that was easy to hold and was secure enough to hold a loco and comfortable to hold and manipulate the locomotive into different positions. I used inserts from Kato bookcases that Ive gotten over time and came up with the cradle in the pics below. I used hot glue because Elmers wouldn't stick the pieces together.
April 23, 2024
April 22, 2024
Working on the EH200 today.
Today I took out the EH200 with the intention just of running it but I decided afterward to install the details on it. So I took out the details and started to add them, Antennas, Grab Irons and number boards I did the whole nine yards lol. Although most of the details went on without effort the grab irons were a pita. I lost two of the grab irons off the sprue that flew into outer space but an hour after it went missing I found a grab iron and successfully installed it lol. Below are a couple of pics after all the details were installed.
April 21, 2024
I installed light units in the GM JR 103 Series Cab Units
These GreenMax JR 103 Series are getting a workout that's for sure. I recently installed the GreenMax [ 8361 ] Headlight Unit A [Incandescent-like Color] into a couple of cab units.
April 20, 2024
GreenMax JR 103 Series and TOMIX 0381/0382 Coupler Replacement
For some reason there is limited information on how to install TOMIX 0381/0382 couplers into GreenMax bogies. Today I give you instructions and pictures so you can do it yourself.
1) Remove the bogie from the car.
2) Turn the bogie upside down with wheels in the air.
3) Press the coupler into bogie.
4) Rotate the coupler 90 degrees, then remove the coupler.
5) Remove the spring and put it someplace safe.
6) Assemble the new TOMIX coupler and observe proper orientation.
7) Put the properly assembled TOMIX coupler into the bogie.
8) Put the spring back on the post.
9) Use tweezers to compress the spring between the post and the coupler.
10) Reattach completed bogie back onto the train car.
11) You're done congratulations.
 |
| Peek A Boo spring |
 |
| Put that spring somewhere safe |
 |
| Bunch of completed bogies |
 |
| Looking good. |
 |
| Bye bye Rapido |
Subscribe to:
Posts (Atom)


